It’s almost Christmas, people. That means that you have less than days to go before Christmas! Did you just think, “Oh shoot. I haven’t gotten anyone anything!”? That’s understandable. Like most of us, you’ve probably been way too busy thinking about that Philo project due tomorrow rather than trying to figure out what to do with your Christmas list (if it even exists).
If you’re the type who cringes at the sight of the letters “DIY,” don’t fret. Vantage pulled together this quick and easy tutorial to make cards that are sure to impress. You probably already have the materials lying around somewhere in your room, so that shouldn’t be a problem.
And so what if they don’t look that Pinterest-worthy? Remember, it’s always the thought that counts. What better way to show your appreciation for the seatmate who always gives you size-four, or the beadle who never records your cuts, than by giving them all handmade cards devoid of cheesy Hallmark card sayings? Bonus if you decide to make the cards to accompany an actual gift.
For this project, you will need:
● Scratch paper
● Coloring materials
● Scissors
● A pen/pencil
● Ruler
● Glue
● Short bond or A4-size plain paper (To make the cards more special, you could use card or colored paper.)
Six-step Christmas card
1. Create the base.

Fold a sheet of the plain/card paper in half, open it and cut along the crease. Fold the resulting sheets in half. Now you have two base cards ready for decorating!
2. Draw the border.

This is pretty self-explanatory. The type of border you choose to draw is up to you, but some basic suggestions would be the dotted line, straight line, double straight line, or wavy line. It’s perfectly fine to use any pen color, but a green or red pen would make it look more festive.
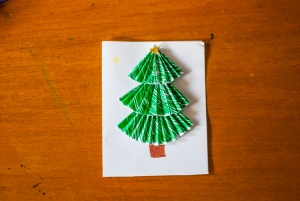
3. Make the shapes.
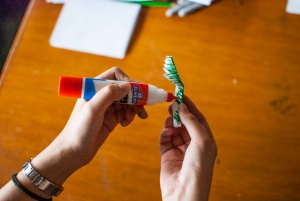
For this card, we made a Christmas tree with a few shapes that were folded using the accordion technique. You can do this by cutting out three small pieces of scratch paper (old receipts work fine too) of varying sizes (the smallest being about 8.2mm, and the largest being about 10.5mm in length). Using markers, paint or any other coloring materials you have on hand, fill the whole paper with green.
To do the accordion fold, first make a small lengthwise crease, then bend each succeeding fold in the opposite direction of the previous fold and so on. Once the entire piece of paper is folded, fold it in half lengthwise. Apply a dab of glue to the connecting ends. Do this for the other two pieces of paper.
NOTE: If you’re short on time, you can just draw and color in your desired shapes on sheets of scratch paper, old receipts, newspapers or magazines, color and cut them out.
4. Put everything together.

Put a dab of glue on the tip of the smallest piece of accordion-folded paper and stick it onto the upper part of the front of the card. Layer the two remaining pieces to form a Christmas tree. Glue the other shapes that you might have made onto the front as well.
5. Write the message/dedication.
Write a message in the inside of the card. The content of the message depends entirely on you and your relation to the recipient. It can be as short and simple as “Merry Christmas” or as long and detailed as a novella—it’s all up to you!
6. Give up and just print out the ready-made designs we have available for download.
If all hope is lost and you don’t know what to do, we’ve got a bunch of card designs for you to share online and in real life! Do step 1, print the design of your choice, cut it out and stick to the front! Below are also a few suggestions for who to give them to:
- For the prof who hates you
- For the cute guy/girl in one of your classes
- For the blockmates you would like to get to know better or Father Jett S. Villarin, SJ
- For the beadle who never records your cuts; the classmate who is always prepared with paper/glue/stapler
- For your athlete friend
Download our sample greeting cards here.